
What is Alcohol Ink and What Should I Know About it?
Alcohol inks are a type of solid-based dyes that can create beautiful designs when applied to nonporous surfaces, like glassware, ceramics, and others. It comes in small bottles with dropper-like dispensers, making them simple and easy to use. They are a fantastic tool that can allow you to create all sorts of unique pieces of art. That being said, there are several things people should know about alcohol ink before ever attempting to use it:
- It moves and dries very quickly, so you need to work fast to create your designs.
- It stains surfaces and skin (though it will wear off relatively quickly), so it’s often a smart idea to wear gloves when using it. However, this is technically optional.
- Design mistakes can easily be removed and corrected with rubbing alcohol.
- Less is more when using alcohol ink. Stick to using just a few drops at a time.
- Don’t use it in areas that will touch food or drinks. Alcohol ink is meant to add decorative designs but should always be done on the outside of any glasses.
- Work outside or in a very well-ventilated area, especially if you’re using compressed air, as both products can create fumes.
- You can find quality sets of alcohol ink or individual bottles at most local craft stores and online.
Related: How To Pack Wine Glasses
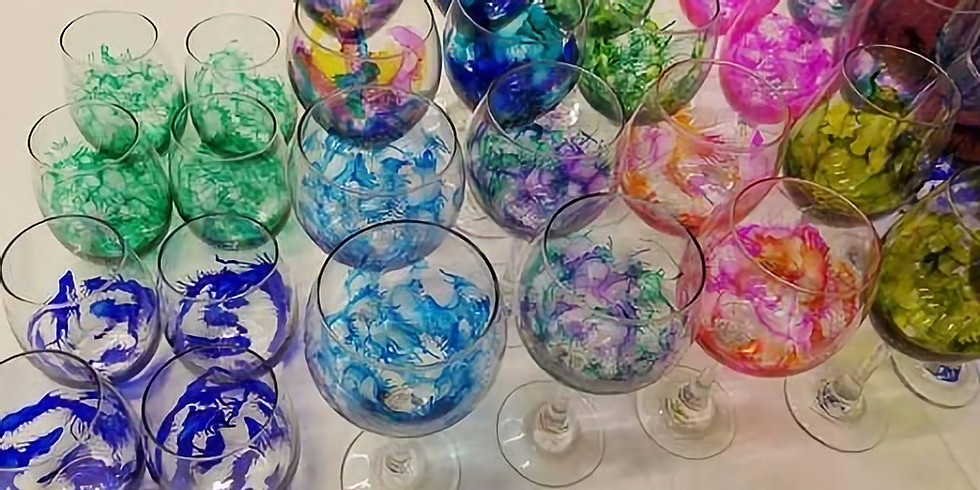
Wine Glass Customization: Applying and Sealing Alcohol Ink Step by Step

Source: https://www.pinterest.com/pin/494833077787698543/
Alcohol ink is an enjoyable artistic medium, though it can take a good deal of practice to get used to it due to the unique way it moves, dries, and blends. There are several methods that people can utilize when working with alcohol inks, but beginners would do well to try following these steps until they are used to how the inks operate.
Required Materials
- Wine glasses
- Alcohol ink
- Rubbing alcohol
- Canned compressed air with a straw
- Normal drinking straws
- Latex gloves
- Sprayable glass sealants (like Krylon’s Kamar Varnish)
- Dishwasher safe Modge Podge
- Newspaper, aluminum foil, or a plastic tablecloth
Set Up a Protected Workspace
Remember, alcohol inks and compressed air create many fumes, so make sure you’re working in a well-ventilated area if you’re not doing it outside. Also, remember that alcohol ink stains surfaces, so make sure you lay down a newspaper, aluminum foil, a tablecloth, or otherwise work on a surface that you don’t mind getting stained. Finally, make sure that you have all of your materials laid out in a way that promotes ease of access. Alcohol ink dries quickly, so you’ll have to be fast when creating your custom designs, especially if you want to combine many different colors.
Related: How to Paint Wine Glasses
Wash and Dry Your Glasses
It’s essential to ensure that all of the dishes you’ll be customizing are clean, dry, and devoid of any visible film or other residue. So clean your glasses first with soap and water, let them dry, and then wipe the outside of them one more time with rubbing alcohol. This should ensure that no residue on the glasses could interfere with the movement or setting of the ink.
Alcohol Ink Techniques
There is a wide range of unique techniques that you can use when applying alcohol ink to an object, and some are more complex than others. If you’ve used alcohol ink before, you may have better luck experimenting with some application methods than others. Follow the link provided above for detailed instructions on the different techniques you can try and each step involved. Remember that mistakes can easily be wiped away with rubbing alcohol, so don’t stress about imperfections and focus on having fun.
Applying Sealants
Once all of the alcohol ink has been applied (no matter what technique you choose to utilize), it’s time to seal it in place to help ensure that the lovely color and unique designs will remain even after several uses and washings. There is a wide range of sealers that you can choose from for your project, and some people recommend using either a sprayable sealant (like Krylon’s Kamar Varnish) or spreadable ones (like dishwasher safe Modge Podge). For the best possible protection, however, we recommend using both types of sealants.
Following the directions provided by the manufacturer, apply the sprayable sealant to the glasses first and allow the sealant time to completely dry. Finally, apply a coating of dishwasher-safe Modge Podge to the glasses and allow them to dry. These two separate coatings should help ensure that your custom alcohol ink designs stay clear and vibrant for as long as possible.
Are you planning an upcoming wine and cheese party but need some fancy new glassware to pull everything together? Take a look at the top-quality stemware and wine glasses offered by Taste of Purple.
Wine Glass Alcohol Ink Customization: FAQ, Tips, and Tricks

Source: https://www.pinterest.com/pin/30962316169210213/
Do You Need To Seal the Alcohol Ink?
In short; yes. You pretty much always need to use some sealer on alcohol inks, no matter what type of project you are using them for. Otherwise, it will be very easy for the designs to be whipped off or fade away naturally over time. Sealing the ink prevents this from happening and helps to ensure that the designs remain permanent.
Related: The Pearl vs. The Cork
How Long Does it Take For Alcohol Ink to Dry?
As stated above, alcohol ink dries very quickly. Or, at least it dries quickly enough that you can’t manipulate it to create new designs anymore (typically referred to as tacky dry). This can occur in as little as a few minutes, depending on factors like temperature and humidity. Alcohol ink takes approximately 24 hours to fully dry once it has been applied to a surface.
Are you looking for some top-quality stemware and wine glasses to serve as the centerpiece for an up-and-coming dinner party? Check out the selection of gorgeous glassware offered by Taste of Purple today.